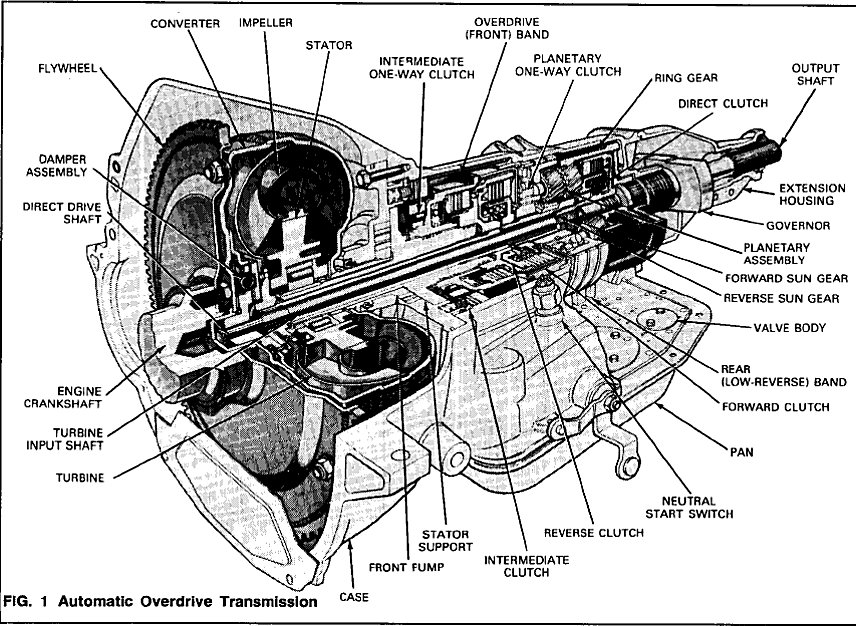
AOD
REMOVAL AND INSTALLATION
Transmission
NOTE: Completely clean all transmission components, including converter, cooler, cooler lines, main control valve body, governor, all clutches, and all check balls after any transmission servicing that generates contamination. These contaminants are a major cause for recurring transmission troubles and must be removed from the system before the transmission is put back into service In addition, the cleaning of debris from the direct clutch check ball is often omitted. This omission can lead to a repeat servicing of the transmission.
NOTE: Do not soak oil filter in solvent cleaner. The filter material could disintergrate. Replace filter if transmission fluid is contaminated.
Removal
1. Raise the vehicle on a hoist or stands.
2. Place the drain pan under the transmission fluid pan. Starting at the rear of the pan and working toward the front, loosen the attaching bolts and allow the fluid to drain. Finally remove all of the pan attaching bolts except two at the front, to allow the fluid to further drain. With fluid drained, install two bolts on the rear side of the pan to temporarily hold the pan in place.
3. Remove the converter drain plug access cover from the lower end of the converter housing.
4. Remove the converter-to-flywheel attaching nuts. Place a wrench on the crankshaft pulley attaching bolt to turn the converter to gain access to the nuts.
5. Place a drain pan under the converter to catch the fluid. With the wrench on the crankshaft pulley attaching bolt, turn the converter to gain access to the converter drain plug and remove the plug. After the fluid has been drained, reinstall the plug.
6. Disconnect the driveshaft from the rear axle and slide shaft rearward from the transmission.
NOTE: To maintain initial driveshaft balance, mark the REAR driveshaft yoke and axle companion flange so they may be installed in their original positions.
Install a seal installation tool in the extension housing to prevent fluid leakage.
7. Disconnect the cable from the terminal on the starter motor. Remove the two attaching bolts and remove the starter motor. Disconnect the neutral start switch wires at the plug connector. Service and Repair
8. Remove the rear mount-to-crossmember attaching bolts and the two crossmember-to-frame attaching bolts.
9. Remove the two engine rear support-to-extension housing attaching bolts.
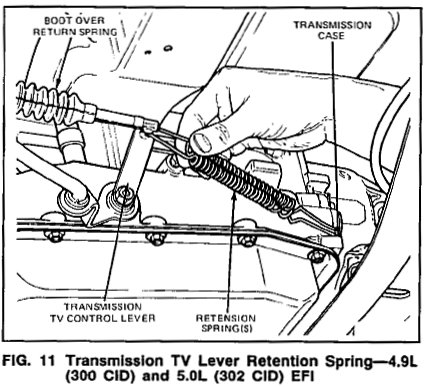
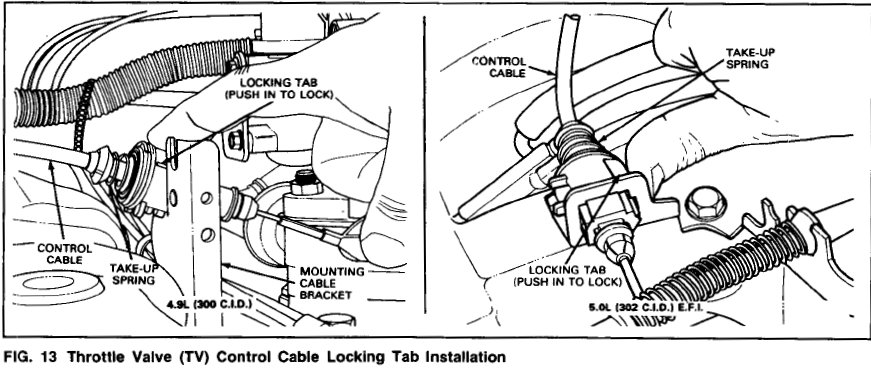
10. Disconnect the TV cable from the transmission TV lever. Disconnect the manual rod from the transmission manual lever at the transmission.
11. Remove the two bolts securing the bellcrank bracket to the converter housing.
On 4x4 applications, remove the transfer case.
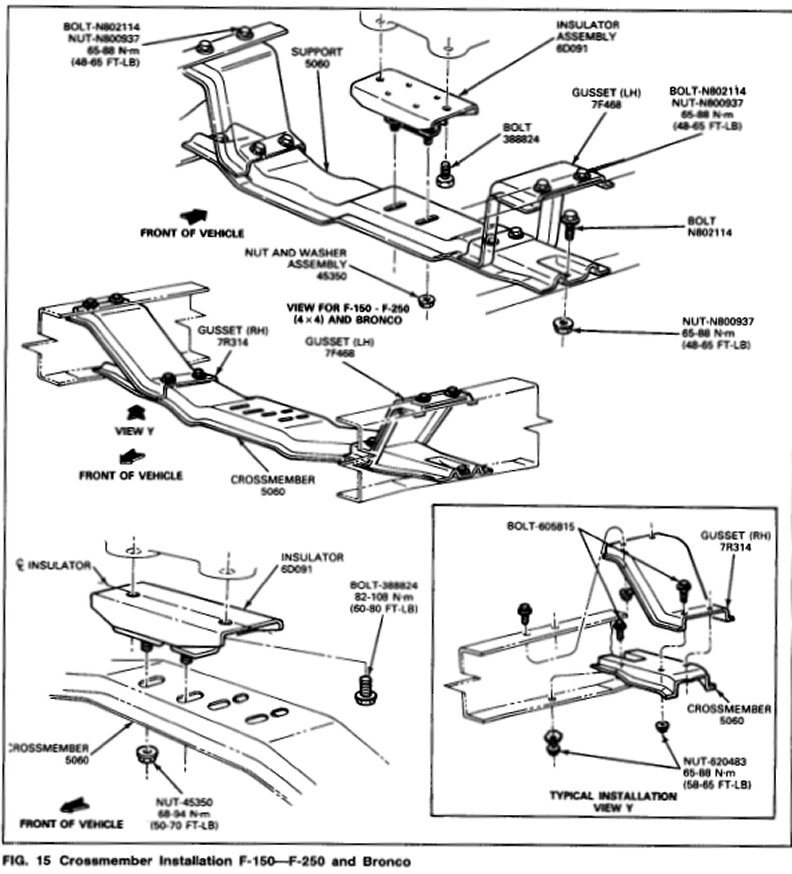
12. Raise the transmission with a transmission jack to provide clearance to remove the crossmember (Fig. 15). Remove the rear mount from the crossmember and remove the crossmember from the side supports.
NOTE: The 4x4 application has a deep well oil pan. Use a transmission jack that will allow clearence for the oil pan depth and still provide support for the transmission at the oil pan rail.
13. Lower the transmission to gain access to the oil cooler lines.
14. Disconnect each oil line from the fittings on the transmission.
15. Disconnect the speedometer cable from the extension housing.
16. Remove the bolt that secures the transmission fluid filler tube to the cylinder block. Lift the filler tube and the dipstick from the transmission.
17. Secure the transmission to the jack with the chain.
18. Remove the converter housing-to-cylinder block attaching bolts.
19. Carefully move the transmission and converter assembly away from the engine and, at the same time, lower the jack to clear the underside of the vehicle.
20. Remove the converter and mount the transmission in a holding fixture.
Transmission Installation
1. Tighten the converter drain plug to specifications.
2. Position the converter on the transmission, making sure the converter drive flats are fully engaged in the pump gear by rotating the converter.
3. With the converter properly installed, place the transmission on the jack. Secure the transmission to the jack with a chain.
4. Rotate the converter until the studs and drain plug are in alignment with the holes in the flywheel.
5. Move the converter and transmission assembly forward into position, using care not to damage the flywheel and the converter pilot. The converter must rest squarely against the flywheel. This indicates that the converter pilot is not binding in the engine crankshaft.
6. Install and tighten the converter housing-to-engine attaching bolts to specification.
7. Remove the safety chain from around the transmission.
8. Install a new 0-ring on the lower end of the transmission filler tube. Insert the tube in the transmission case and secure the tube to the engine with the attaching bolt.
9. Connect the speedometer cable to the extension housing.
10. Connect the oil cooler lines to the right side of transmission case.
11. Secure the engine rear support to the extension housing and tighten the bolts to specification.
12. Position the crossmember on the side supports. Position the rear mount on the crossmember and install the attaching bolt and nut.
13. Install the transfer case. Refer to the appropriate transfer case Section Transfer Case Lower the transmission and remove the jack.
14. Secure the crossmember to the side supports with the attaching bolts and tighten them to specification.
15. Position the bellcrank to the converter housing and install the two attaching bolts.

16. Connect the TV cable to the transmission TV lever. Connect the manual linkage rod to the manual lever at the transmission.
17. Secure the converter-to-flywheel attaching nuts and tighten them to specification.
18. Install the converter housing access cover.
19. Secure the starter motor in place with the attaching bolts. Connect the cable to the terminal on the starter. Connect the neutral start switch wires at the plug connector.
20. Install the driveshaft so the index marks on the companion flange and rear yoke are aligned.
21. Adjust the shift linkage as required.
22. Adjust throttle linkage per the procedure outlined in the beginning of this section. Adjustments
23. Lower the vehicle.