Accumulator Piston
Accumulator Piston
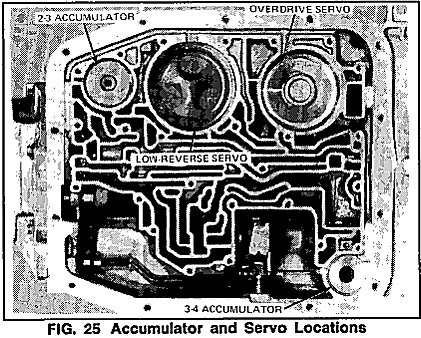
Refer to Fig. 25.
Removal
1. Raise the vehicle on a hoist so the transmission oil pan is accessible.
2. Starting at the rear and working toward the front, loosen the oil pan attaching bolts and drain the fluid from the transmission. If the same fluid is to be used again, filter the fluid through a 100 mesh screen. Reuse the fluid only if the fluid is in good condition.
3. Remove the transmission oil pan attaching bolts, pan and gasket. Discard gasket.
4. Remove the dacron filter-to-valve body attaching bolts and remove the dacron filter, grommet and gasket. Discard gasket. If the fluid was contaminated, discard the filter.
5. Remove the detent spring and attaching bolts.
6. Remove the valve body-to-case attaching bolts (25). Remove the valve body. Discard valve body-to-case gasket.
7. To remove the 3-4 accumulator piston, depress the cover and remove the retaining snap ring.
8. Slowly release the tension on the 3-4 accumulator cover, allowing the removal of the piston cover, return spring and piston. (Some models do not use a spring).
9. It necessary, apply air pressure to the hydraulic apply passage using servo release Tool T8OL-77030-B or equivalent.
10. Remove the seals from the 3-4 accumulator cover and piston. Inspect seals for possible nicks, cuts or irregular wear patterns, then discard the seals.
Installation
1. Thoroughly clean and inspect the 3-4 accumulator piston and cover.
2. Install new seals on the 3-4 accumulator piston and cover.
3. Thoroughly clean and inspect the accumulator pocket in the case.
4. Lubricate the rubber cover seal and the cover pocket of case with either clean transmission fluid or a petroleum jelly.
5. Reinstall the 3-4 accumulator piston (and return spring) into the case. Reinstall the cover.
6. Depress cover into piston pocket sufficiently to allow clear access to the snap ring groove in the inside diameter of the pocket.
7. Install the retaining snap ring.
IMPORTANT: Cover must then be reseated snug against retaining ring Inspect the outer edge of the 3-4 accumulator piston pocket for nicks or burrs which might have been raised during the removal of installation of the retaining snap ring. Remove nicks or burrs with a fine honing stone and clean the effected surfaces thoroughly. Failure to do so may cause improper seating of the valve body separator plate to the hydraulic passages in the case and subsequent cross leakage.
8. Clean and inspect the valve body prior to installation, if necessary.
9. Position a new valve body gasket to the separator plate.
10. Using valve body guide Pins, Tool T8OL-77100-A or equivalent, position the valve body to the case, making sure that the inner manual lever and inner TV lever are engaged.
11. Install and tighten (25) valve body-to-case attaching bolts.
12. Install and tighten the detent spring and attaching bolt to specification.
13. Remove the guide Pins (T8OL-77100-A or equivalent) and install the two remaining valve body 9-11 N.m (80-100 in-lbs).
14. Position the throttle lever spring against the separator plate.
15. Using three dacron filter attaching bolts install the dacron filter and gasket to the valve body and tighten the attaching bolts to 9-14 N.m (80-120 in-lbs).
16. Glean the transmission oil pan and gasket surfaces thoroughly.
17. Using a new oil pan gasket, secure the pan to the transmission case. Tighten the attaching bolts to 8.0-13.5 N.m (6-10 ft-lbs).
18. Lower the vehicle and fill the transmission to the correct level with the specified fluid. Fluid - A/T
19. Adjust TV cable as outlined in this Section. Adjustments