(B) Paint Exterior Color Peeling From Ultra Violet Light
Paint may be damaged because of ultra violet light absorption through the color coat. This damage will cause the top coat to peel to the E-coat primer.
If service is required, use the following procedure to correct the concerns.
NOTE: READ THE ENTIRE SERVICE PROCEDURE BEFORE STARTING REPAIRS.
WARNING: ALWAYS WEAR A NOISHA/MSHA RECOMMENDED VAPOR/PARTICULATE RESPIRATOR AND USE OTHER RECOMMENDED SAFETY EQUIPMENT.
1. Wash the vehicle with soap and water.
2. Verify topcoat adhesion by applying a 2 inch wide masking tape strip on all body panels above and below the beltline on each panel.
a. Pull the tape up quickly.
b. Inspect the adhesive side of the tape for paint removal.
NOTE: IF PAINT WAS REMOVED DURING THE TAPE TEST, THE ENTIRE PANEL SHOULD BE STRIPPED AND REFINISHED AS NECESSARY.
3. Remove all trim (mouldings, name plates, striping, etc.) from the areas which will be repainted.
NOTE: ALL REQUIRED REPLACEMENT MOULDINGS AND STRIPES SHOULD BE ORDERED AND RECEIVED PRIOR TO REPAIRING THE CUSTOMER'S VEHICLE.
4. Wipe the entire vehicle with wax and grease remover.
^ BASF Product # 900 Prekleano
^ PPG Product # DX300
^ S-W Product # R7-K156
^ DuPont Product # 3919 S
^ Sikkens Product # M 600
5. Mask off all areas on the vehicle which are not going to be painted or will be affected by overspray (engine compartment, wheels, etc.).
6. Remove the paint to bare metal from all the areas of the vehicle which are going to be repainted. Use one of the following methods.
SAND THE AFFECTED AREAS TO BARE METAL USING 40 GRIT 3M GREEN CORPS SANDING DISCS OR EQUIVALENT AND A SOFT PAD ON A 1700 RPM POLISHER. KEEP THE POLISHER MOVING TO AVOID DEVELOPING HOT SPOTS ON THE METAL.
NOTE: CHEMICAL STRIPPING IS NOT RECOMMENDED.
NOTE: IF AVAILABLE, PAINT MAY BE REMOVED USING A PLASTIC MEDIA BLAST SYSTEM. IF THIS PROCESS IS USED, EXTRA CARE MUST BE TAKEN DURING THE MASKING PROCESS TO PREVENT DAMAGE TO GLASS, MOULDING, ETC.
7. Blow off the entire vehicle to remove loose dust and debris.
NOTE: IF RUST IS PRESENT, USE APPROPRIATE METAL CLEANER AND CONDITIONER (PHOSPHATE COATING) OVER BARE METAL AREAS.
8. Wipe all affected areas with a fast dry enamel reducer solvent, followed by a dry wipe using a clean, lint free cloth to remove all residue.
CAUTION: KEEP WIPING UNTIL SURFACE IS COMPLETELY DRY. ANY RESIDUE WILL RESULT IN POPPING OF THE COATINGS TO BE APPLIED FOLLOWING THIS STEP.
NOTE: THIS STEP WILL REDUCE THE POSSIBILITY OF FLASH RUST.
^ BASF Product # BR 50
^ PPG Product # DX 300
^ S-W Product # R7 K156
^ DuPont Product # 3812 S
^ Sikkens Product # 123 FAST
9. Apply two medium wet coats (1.0 mil total) of self-etching, anti-corrosion primer using the manufacturer's recommendations and flash times.
^ BASF Product # DE-17
^ PPG Product # DP EPOXY PRIMER
^ S-W Product # E2-6980
^ DuPont Product # VARIPRIME
^ Sikkens Product # WASH FILLER 580
10. Apply three medium wet coats (2.0 mils total) of acrylic urethane primer surfacer following the manufacturer's recommended procedures.
^ BASF Product # DP-20 PRIMER/SUFACER
^ PPG Product # K-36
^ S-W Product # P6-M49 OR P6-A48
^ DuPont Product # URO PRIMERFILLER
^ Sikkens Product # AUTOCRYL 3+1 FILLER
11. Sand the vehicle using one of the following methods:
^ Wet-sand by hand using 400 grit or finer sandpaper.
^ Dry-sand by hand using 320 grit or finer sandpaper.
12. Blow the entire vehicle off to remove loose dust and debris.
13. Demask (remove all paper and tape) as necessary to remove the primer and dirt buildup on the paper and tape.
14. Wipe the entire vehicle with wax and grease remover, followed by a dry wipe using a clean, lint free cloth to remove all residue.
CAUTION: KEEP WIPING UNTIL SURFACE IS COMPLETELY DRY. ANY RESIDUE WILL RESULT IN POPPING OF THE COATINGS TO BE APPLIED FOLLOWING THIS STEP.
^ BASF Product # 901 PRE-PAINT CLEANER
^ PPG Product # DX 330
^ S-W Product # R7-K156
^ DuPont Product # 3812 S
^ Sikkens Product # M 600
15. Mask all areas on the vehicle which are not to be painted or will be affected by paint overspray (engine compartment, wheels, etc.).
NOTE: APPLY BASECOAT/CLEAR COAT ONLY TO SURFACES WHICH ORIGINALLY HAD BASECOAT/CLEAR COAT
16. Apply three medium wet coats (enough material to hide primer) of acrylic enamel base coat or acrylic urethane monocoat following the manufacturer's recommended procedure.
^ BASF Product # DIAMONT BASECOAT/Solo
^ PPG Product # DELTRON BASECOAT DBC/Deltron
^ S-W Product # ULTRA BASE/Ultra One Stage
^ DuPont Product # CHROMABASE/Cronar
^ Sikkens Product # AUTO BASE/Autocryl
17. Apply two medium wet coats of 2K acrylic urethane enamel clear coat, following manufacturer's recommended procedure.
^ BASF Product # DIAMONT CLEAR 88/89
^ PPG Product # CONCEPT 2001 DCU
^ S-W Product # CC-650 OR CC-640
^ DuPont Product # 1080 S URO CLEAR
^ Sikkens Product # AUTO CLEAR
18. After the paint is dry, demask the entire vehicle and clean up any areas which have overspray.
19. Polish the vehicle as necessary to remove any defects in the paint which may create a customer concern.
CAUTION: USE LOW SPEED (1700 RPM MAXIMUM) POLISHER.
20. Install all trim (mouldings, name plates, striping, etc.) on the vehicle which were removed prior to repainting.
21. Clean the exterior and interior of the vehicle thoroughly, including air ducts and other areas which are prone to accumulating dust. This step is essential to ensure customer satisfaction.
WARNING: OUR ENVIRONMENT IS PRECIOUS - PLEASE USE PROPER DISPOSAL TECHNIQUES FOR ANY VOLATILE ORGANIC COMPOUNDS (V.O.C.'s) OR EXCESS MATERIALS.
Figure 1:
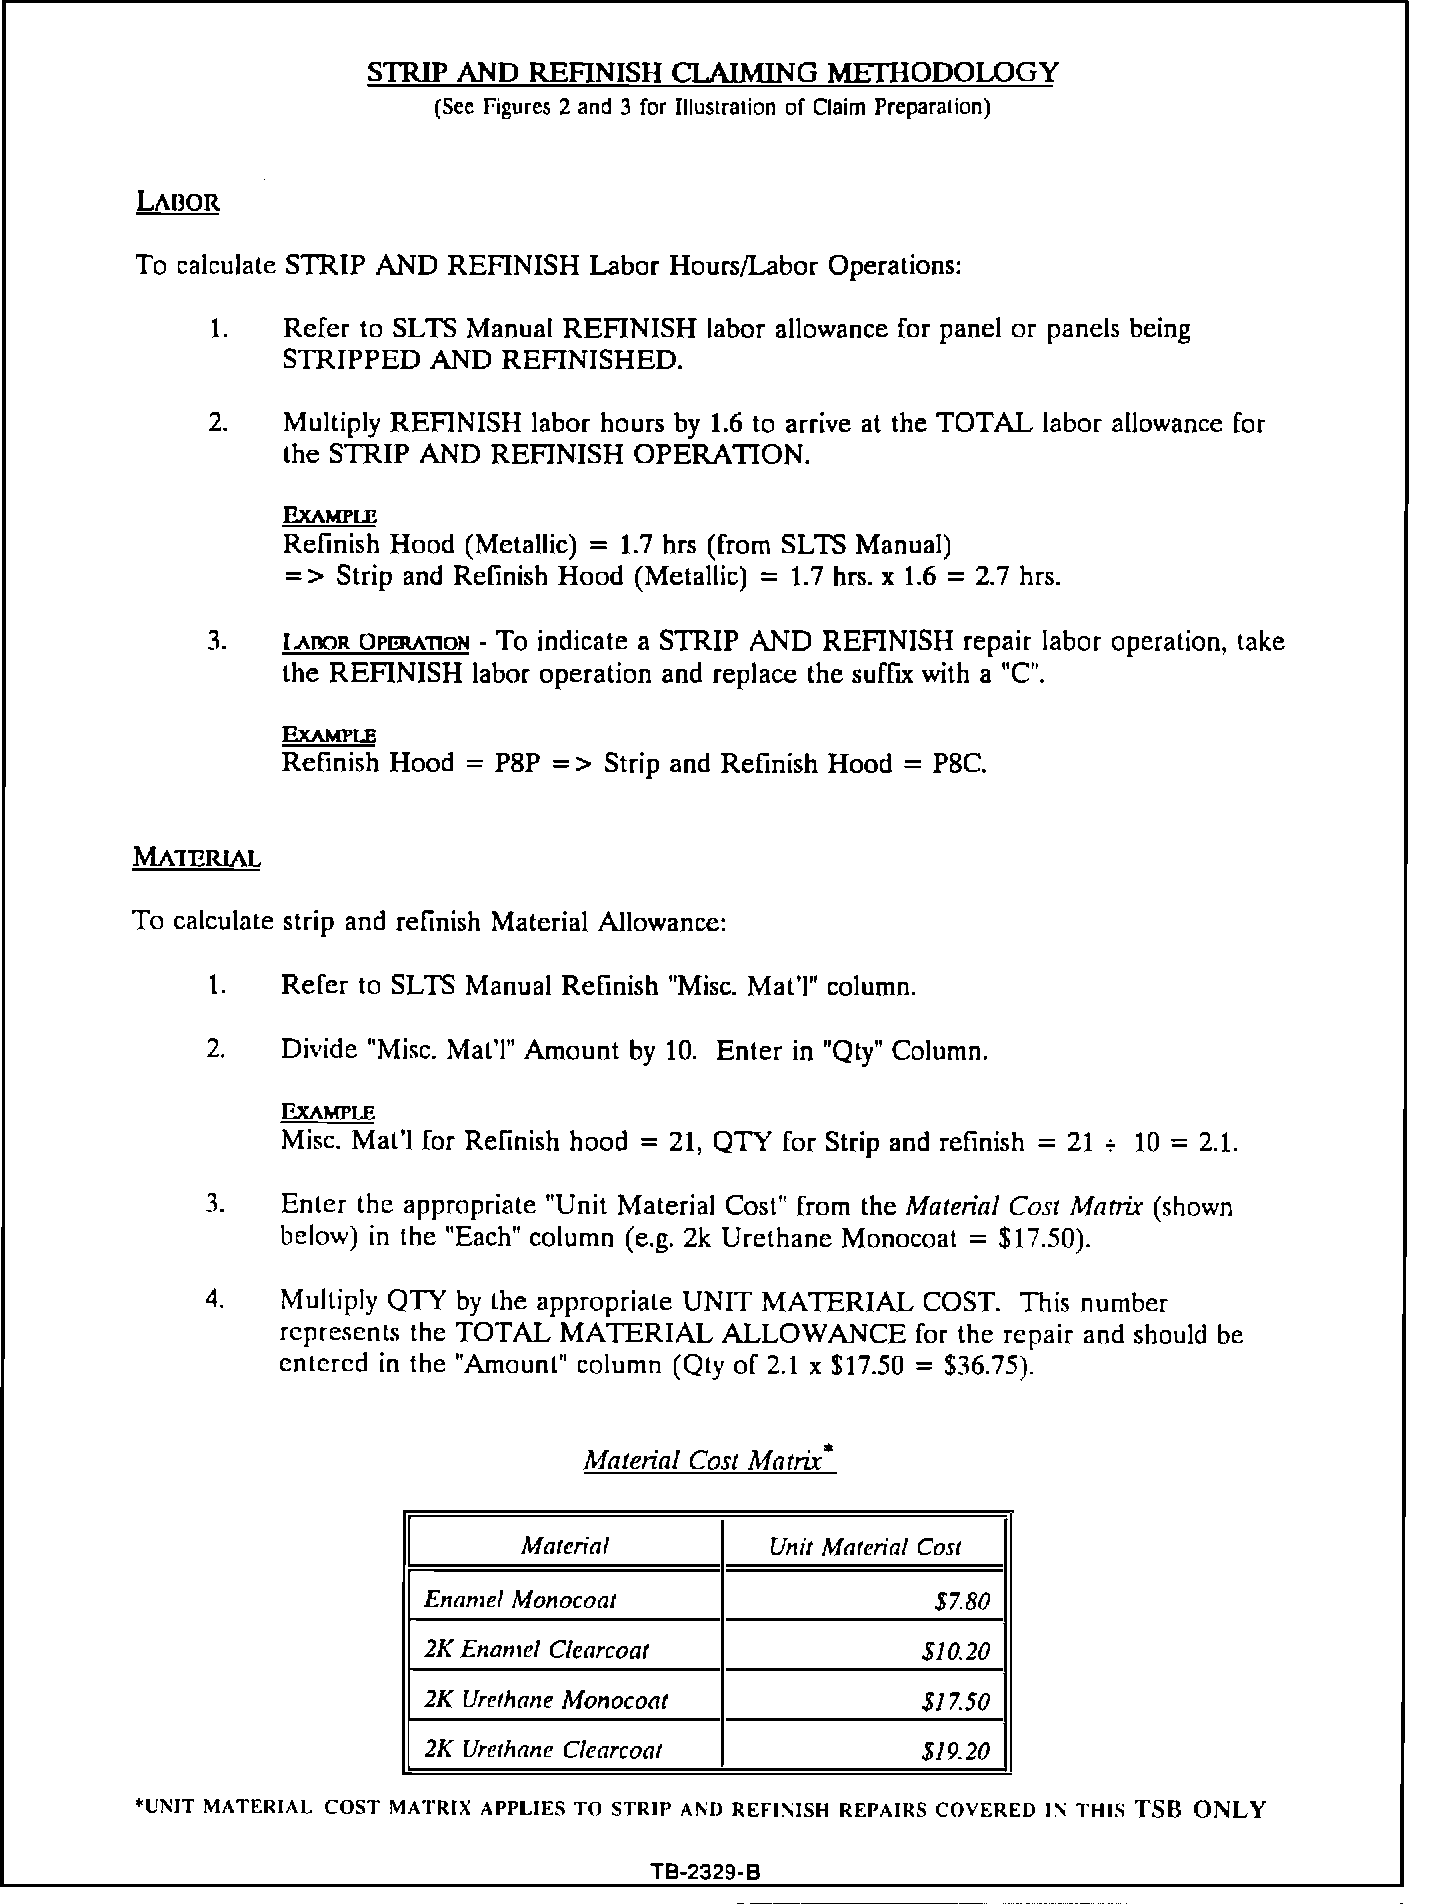
Figure 2:
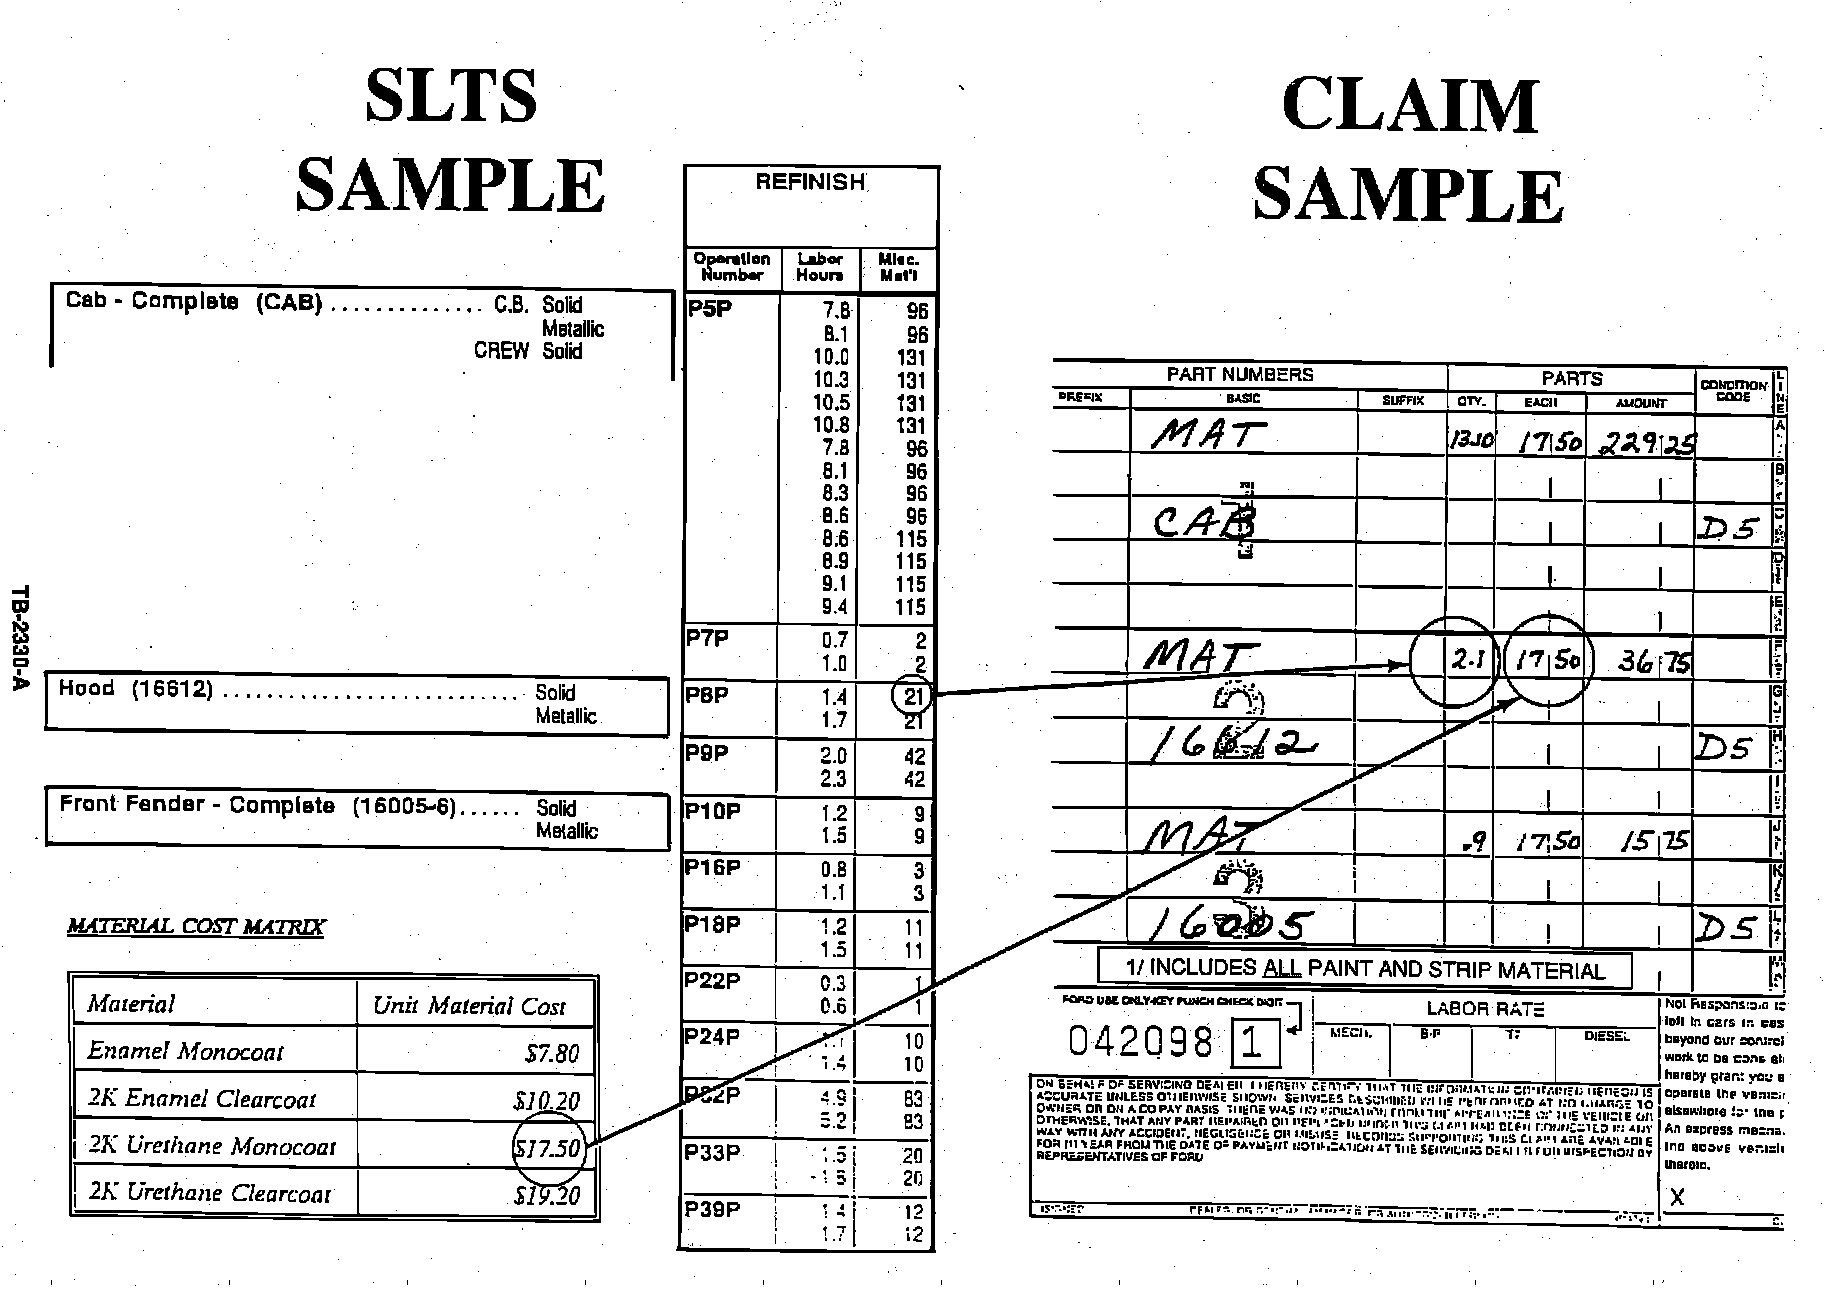
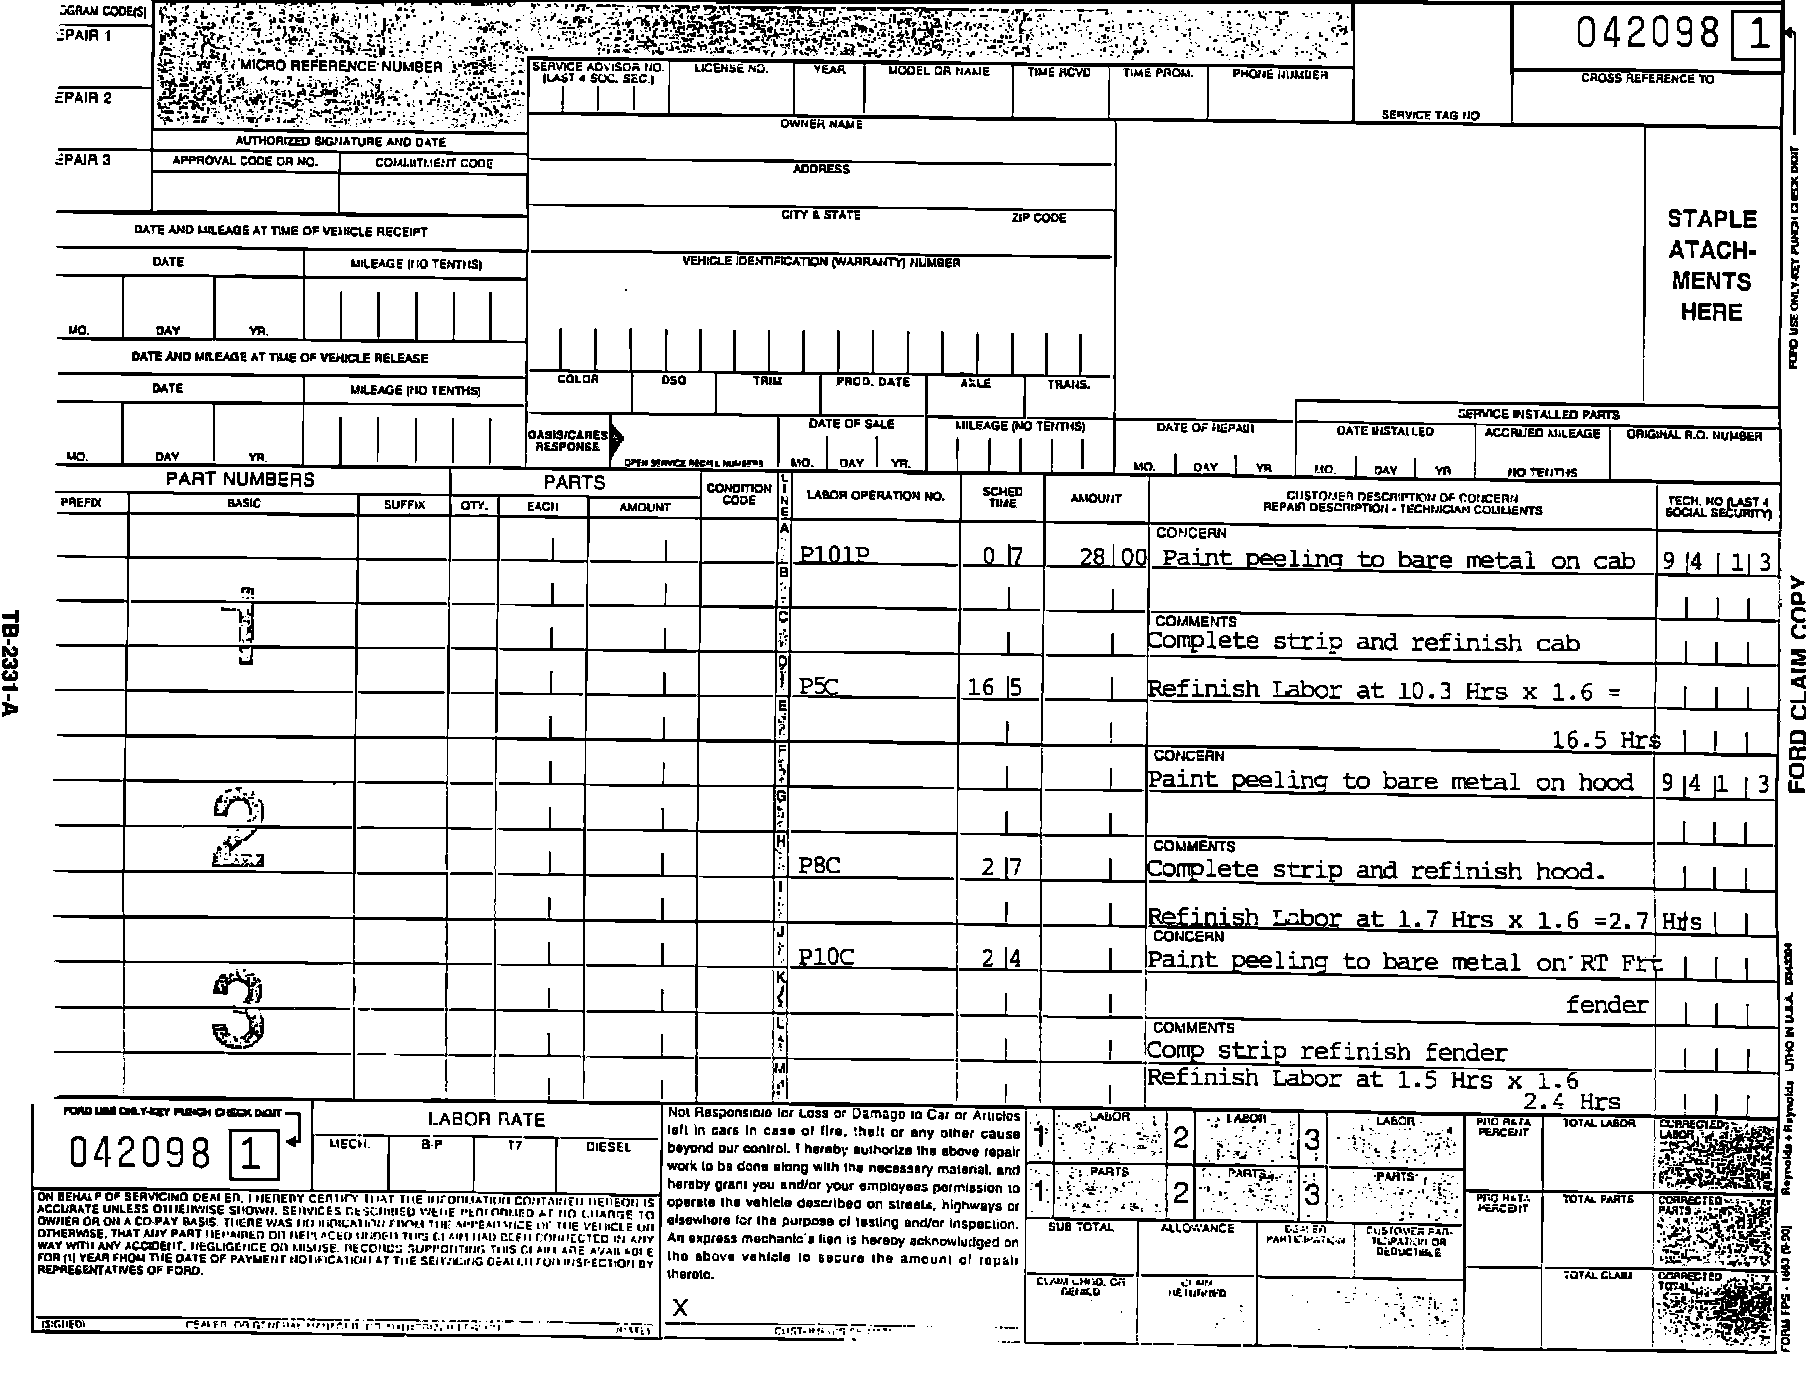
Figure 3:
STRIP AND REFINISH CLAIMING METHODOLOGY
The claiming instructions shown in Figure 1 are applicable to the repair of the EXTERIOR COLOR PEELING FROM ULTRA VIOLET LIGHT concern covered in this TSB only. See the SAMPLE CLAIMS, Figures 2 and 3, for examples.